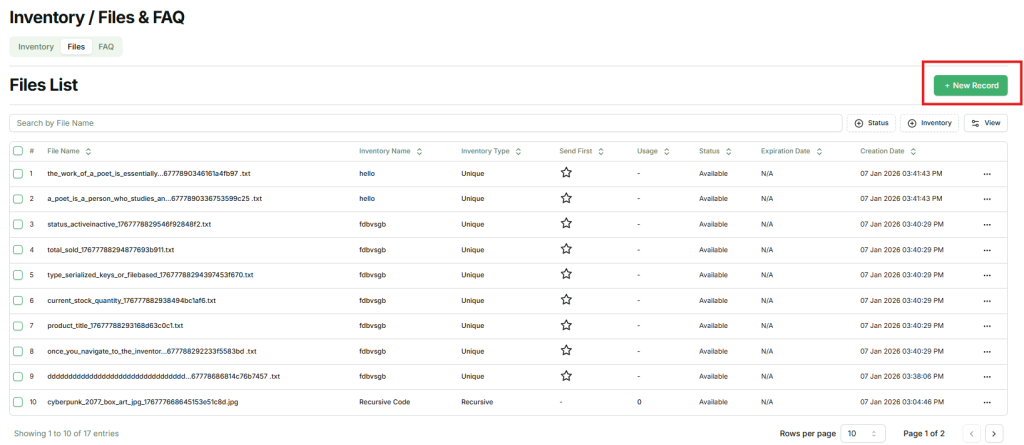
The Files List displays all files that are added and allocated to inventory items in the EZDZSEND platform. These files represent the actual digital content that can be available for delivery or delivered to customers based on their current status. Each file is linked to a specific inventory item and is managed directly from this section, allowing sellers to monitor availability, usage, and delivery priority. Inventory files may include text files, digital codes or keys (such as game keys or license keys), PDF documents, images, audio files, ZIP archives, and other supported digital file formats.
Available Actions in Files List:
- Add New Files
- Set as Used
- Set as Available
- Set as Faulty
- Set as Expired
- Set as Reserved
- Download
- Delete
Add New Files #
Sellers can upload and manage digital content for their inventory items using the Add New Files feature. To add files, follow the steps below:
1. Navigate to the Files Tab
From the seller dashboard, go to the Files tab. On this page, you will find a button labeled New Record.
2. Open the New Record Modal
Click the New Record button. A modal will appear where you can upload or create new files.
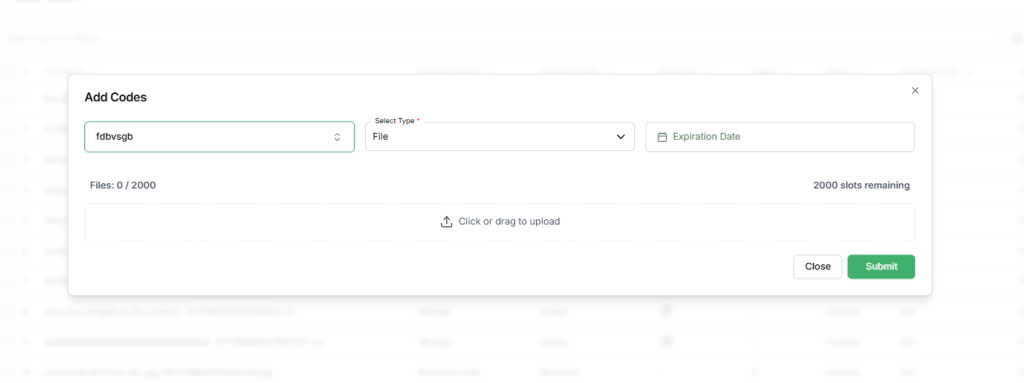
3. Select Inventory
Choose the inventory item to which the files will be assigned. Files must be linked to an inventory before they can be delivered.
4. Select File Type
Select one of the following mandatory file types:
- File
- Text
5. Set Expiration Date (Optional)
Define an expiration date for the files. After this date, the files will be marked as expired and will no longer be available for delivery.
Uploading Files (File Type: File) #
When File is selected as the file type:
- Sellers can upload up to 2,000 files at a time.
- Supported file formats include PDF, TXT, ebooks, audio files (music), ZIP files, images, and other digital product formats.
- Once the files are selected and the Submit button is clicked, all files will be uploaded and assigned to the selected inventory item.
Adding Text-Based Files (File Type: Text) #
When Text is selected as the file type:
- There is no limit on the number of entries that can be added.
- Sellers can type or paste content directly into the text field.
- Each time the seller presses Enter, the content after the line break is treated as a new and separate file.
This allows sellers to easily add multiple codes or keys in bulk without uploading individual files.
Once the files or text entries are submitted, they will be added to the selected inventory and become available for management and delivery. This process ensures sellers can efficiently upload and organize large numbers of digital products with ease.
Set as Used #
Sellers can manually mark a file as used to prevent it from being delivered to customers. Follow these steps to set a file as used:
1. Locate the File
From the Files List, find the file you want to mark as used.
2. Open the Action Menu
Click the action button (…) next to the file. A popup menu will appear.

3. Select Set as Used
In the popup, click Set as Used.
4. File Status Update
Once selected, the file will be marked as Used.
⚠️ Important:
- Files marked as Used will not be delivered to customers, regardless of whether the file is set as Unique or Recursive.
- This feature allows sellers to control file availability and prevent reuse of specific files.
Set as Available #
Sellers can manually mark a file as available to make it ready for delivery to customers. Follow these steps to set a file as available:
1. Locate the File
From the Files List, find the file you want to make available.
2. Open the Action Menu
Click the action button (…) next to the file. A popup menu will appear.

3. Select Set as Available
In the popup, click Set as Available.
4. File Status Update
Once selected, the file will be marked as Available and can now be delivered to customers.
⚠️ Important:
- Files marked as Available are active and can be delivered according to the inventory settings (Unique or Recursive).
- Sellers can set a file as Available even if it was previously marked as Used, Expired, or Faulty, Reserved it to active status for delivery.
- This feature allows sellers to quickly manage and restore files for circulation whenever needed.
Set as Faulty #
Sellers can mark a file as Faulty to indicate that it is invalid, damaged, or unusable. Files marked as Faulty will not be delivered to customers. Follow these steps to set a file as faulty:
1. Locate the File
From the Files List, find the file you want to mark as faulty.
2. Open the Action Menu
Click the action button (…) next to the file. A popup menu will appear.

3. Select Set as Faulty
In the popup, click Set as Faulty.
4. File Status Update
Once selected, the file will be marked as Faulty.
⚠️ Important:
- Sellers can mark a file as Faulty even if it was previously marked as Used, Available, Expired, or Reserved.
- Files marked as Faulty will not be sent to buyers, ensuring that only valid files are delivered.
- This feature allows sellers to prevent delivery of damaged or invalid files while maintaining control over their inventory.
Set as Expired #
Sellers can mark a file as Expired to indicate that it is no longer valid for delivery. Files marked as Expired will not be sent to customers. Follow these steps to set a file as expired:
1. Locate the File
From the Files List, find the file you want to mark as expired.
2. Open the Action Menu
Click the action button (…) next to the file. A popup menu will appear.
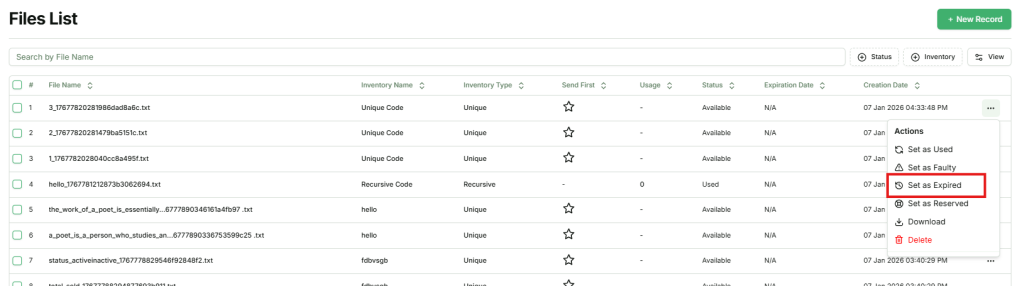
3. Select Set as Expired
In the popup, click Set as Expired.
4. File Status Update
Once selected, the file will be marked as Expired.
⚠️ Important:
- Sellers can mark a file as Expired regardless of its current status (Used, Available, Faulty, or Reserved).
- Files marked as Expired will not be delivered to buyers, ensuring that only valid and active files are used for orders.
- This feature helps sellers maintain control over file availability and prevent delivery of outdated or invalid files.
Set as Reserved #
Sellers can mark a file as Reserved to temporarily hold it and prevent delivery until it is ready to be sold. Files marked as Reserved will not be sent to customers until their status is changed back to Available or another active status. Follow these steps to set a file as reserved:
1. Locate the File
From the Files List, find the file you want to reserve.
2. Open the Action Menu
Click the action button (…) next to the file. A popup menu will appear.
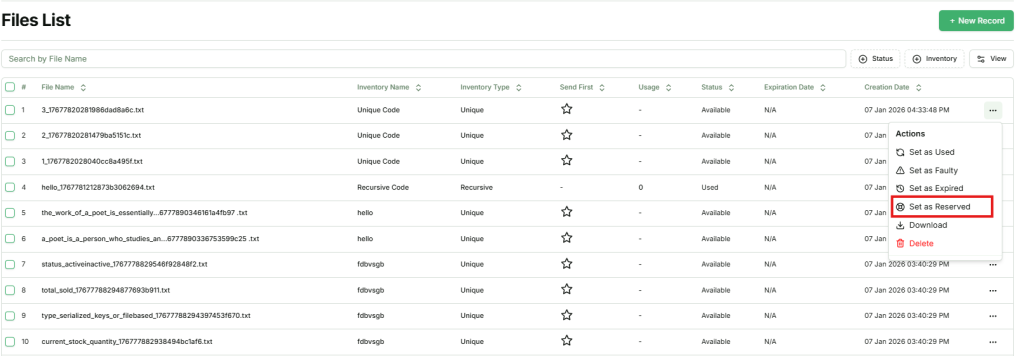
3. Select Set as Reserved
In the popup, click Set as Reserved.
4. File Status Update
Once selected, the file will be marked as Reserved.
⚠️ Important:
- Sellers can reserve a file regardless of its current status (Used, Available, Faulty, or Expired).
- Files marked as Reserved will not be delivered to buyers until their status is updated to Available or another active status.
- This feature allows sellers to manage inventory strategically, holding certain files for future use or delayed delivery.
Download Files #
Sellers can download files from the inventory to their local system for backup or offline use. Follow these steps to download a file:
1. Locate the File
From the Files List, find the file you want to download.
2. Open the Action Menu
Click the action button (…) next to the file. A popup menu will appear.
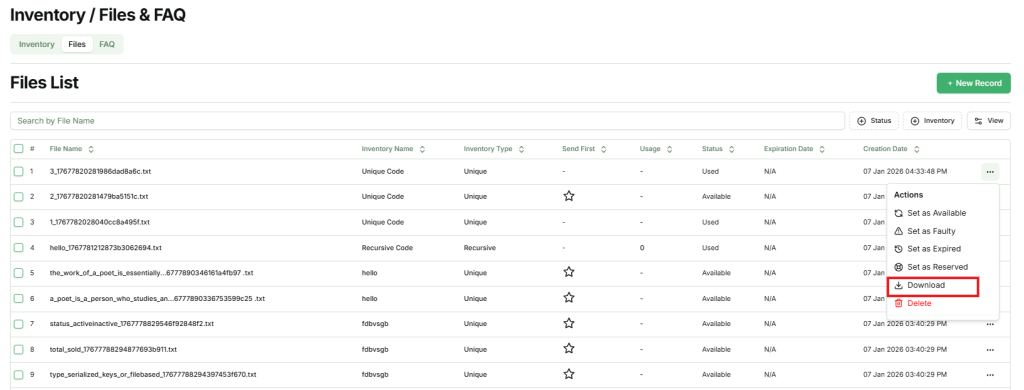
3. Select Download
In the popup, click Download.
4. File Download
The selected file will be downloaded to your device.
⚠️ Important:
- Sellers can download files regardless of their current status (Available, Used, Faulty, Expired, or Reserved).
- This feature allows sellers to maintain offline backups or access files without relying on the platform.
Delete Files #
Sellers can permanently remove files from the inventory using the Delete option. Follow these steps to delete a file:
1. Locate the File
From the Files List, find the file you want to delete.
2. Open the Action Menu
Click the action button (…) next to the file. A popup menu will appear.
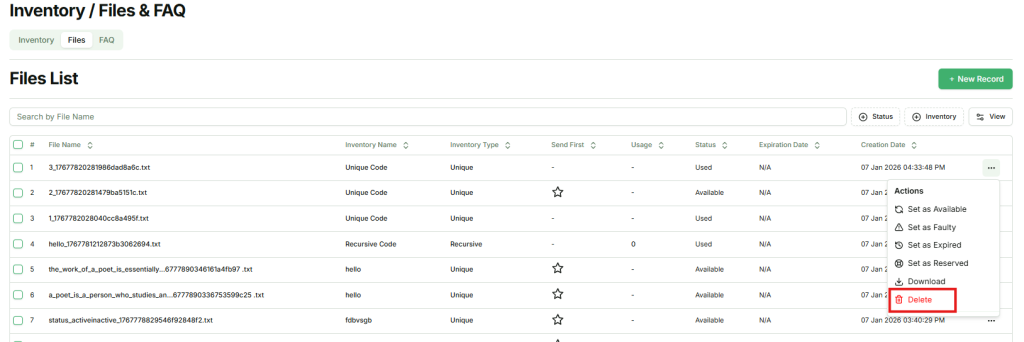
3. Select Delete
In the popup, click Delete. A confirmation modal will appear to prevent accidental deletion.
4. Confirm Deletion
Click Confirm in the modal. The file will be permanently removed from the system.
⚠️ Important:
- Files that are deleted cannot be recovered.
- If a file is already marked as Used (meaning a buyer has purchased it), deleting it will prevent the buyer from accessing that file.
- This feature should be used carefully to avoid disrupting customers who have already received the file.
Send First #
Sellers can prioritize specific files in an inventory by marking them as Send First. This feature allows selected files to be delivered before other files in the same inventory, according to the inventory’s delivery method (FIFO, LIFO, FEFO, or Auto-Random).
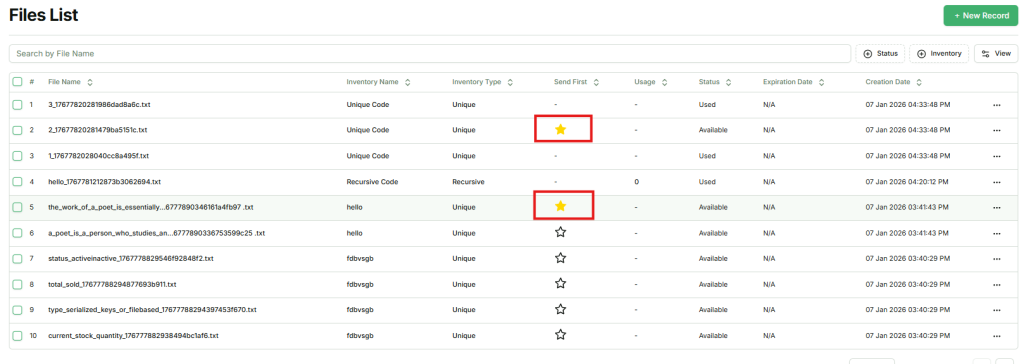
How Send as First Works
- After adding files to an inventory, sellers can select one or more files and mark them as Send First.
- For example, if an inventory has 10 files and the last 3 are marked as Send as First, those 3 files will be delivered before the remaining files when fulfilling orders.
- The delivery order will still respect the inventory’s configured setting (FIFO, LIFO, FEFO, or Auto-Random).
⚠️ Important:
- Send as First only applies to files with Unique delivery type.
- Files with Recursive type cannot be prioritized using Send as First.
- This option allows sellers to control priority delivery for unique files while maintaining proper inventory management.